|
Sort entries by
|
Set the default sort order for lists. Select the column that you want to sort on and then select whether you want to sort in ascending or descending order.
|
|
Auto release order
|
Automatically release purchase orders or transfers as soon as they are saved.
|
|
Block transfer out when quantity on hand is less than transfer out quantity
|
Display a warning if the on hand quantity of an item is lower than the quantity in a transfer out. When you try to commit the transfer out, a warning message displays with the following options:
|
|
Disable order number editing
|
Lock the purchase order number so it cannot be edited.
|
|
Block purchase order when quantity on hand is less than quantity being received
|
Displays a warning when receiving purchase orders if the quantity received (Qty. Rcv) is greater than the quantity ordered (Qty. Ordered), or if the quantity received (Qty. Rcv) is greater than the quantity ordered minus the quantity received to date (Qty. Ordered - Qty. RTD).
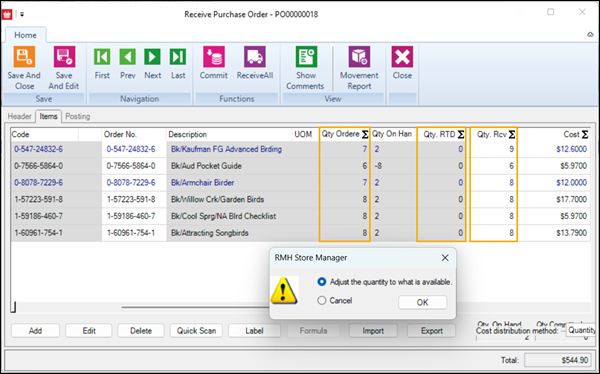
If this option is selected and the quantity received (Qty. Rcv) is greater than expected, when you try to receive the purchase order a message displays with two options:
-
Select Adjust the quantity to what is available to reduce the quantity received (Qty. Rcv) to the remaining quantity to be received (i.e., Qty. Ordered - Qty. RTD).
-
Select Cancel to allow the quantity received (Qty. Rcv) to be greater than the remaining quantity to be received (i.e., Qty. Ordered - Qty. RTD).
|
|
Child reorder
|
Consider the child item quantities when re-ordering the parent.
|
|
Kit reorder
|
Consider the kit item quantities when re-ordering the kit components.
|
|
Check supplier MPQ
|
Order items using only multiples of the supplier's MPQ. Refer to Purchase order best practices for more information.
|
|
Hide cost information in purchase order
|
Hide the store's cost information in purchase orders for users who do not have full manager privileges.
|
|
Hide cost information in transfer in
|
Hide the store's cost information in transfer ins for users who do not have full manager privileges.
|
|
Hide cost information in transfer out
|
Hide the store's cost information in transfer outs for users who do not have full manager privileges.
|
|
Do not allow to make change to purchase order when shipped
|
Lock the Header and Items tabs of purchase orders after they have been shipped so they cannot be edited. Select this option to prevent people from adding or removing items or updating cost.
|