> For the complete documentation index, see [llms.txt](https://docs.rmhpos.com/llms.txt). Markdown versions of documentation pages are available by appending `.md` to page URLs; this page is available as [Markdown](https://docs.rmhpos.com/readme-1/work-with-customers/customers-adding.md).
# Add customer records
This topic describes how cashiers and salespeople can add customer records. It provides detailed explanations of fields and options on the Billing, Options, Additional, and Alias tabs.
{% hint style="info" %}
The **Allow new customers as POS** store rule must be enabled to allow cashiers, salespeople, or managers to add customer records in POS.
{% endhint %}
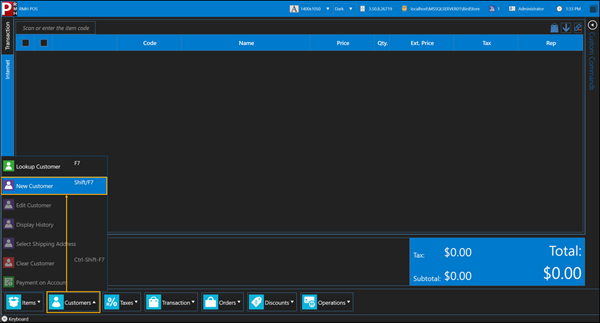
1. Tap **Customers** | **New Customer**.
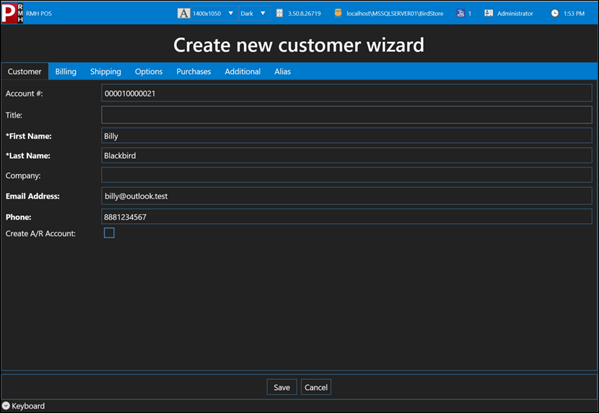
2. On the **Customer** tab, enter the customer's contact information, such as:
* Title
* First Name
* Last Name
* Company (if applicable)
* Email Address
* Phone
{% hint style="success" %}
If the field label is bold, it means the store has defined a customer policy requiring you to enter information into those fields. You cannot save the customer record if those fields are empty.
{% endhint %}
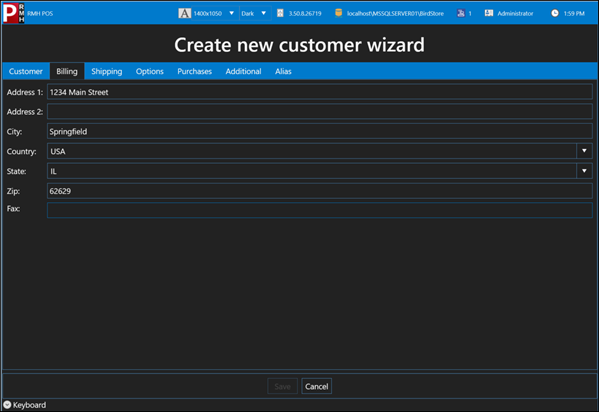
3. (Optional) On the **Billing** tab, enter the customer's billing address. This is only necessary if they will be billed for purchases.
4. (Optional) On the **Shipping** tab, enter the customer's shipping address (or addresses). Refer to [**Add a shipping address**](/readme-1/work-with-customers/shipping-adding-address.md) for more information.
5. On the **Options** tab, select any of the following options that apply to the customer:
* **Exempt from taxes:** Select if the customer is exempt from paying taxes on purchases.
* **Employee:** Select if the customer is an employee.
* **Enforce purchase limits:** This is a legacy field from the Microsoft Dynamics Retail Management System apps. It is not used.
* **Price Level:** Select **Price A**, **Price B**, or **Price C** if the customer is approved for a price level discount. Select **Standard** if the customer is not approved for a price level discount.
* **Discount (%):** Enter a percentage if the customer is approved for a percent discount.
{% hint style="warning" %}
The **Discount (%)** is applied to all items the customer purchases.
{% endhint %}
* **Tax ID Number:** The customer's tax identification number for taxation purposes, if applicable.
6. (Optional) On the **Additional** tab:
1. Enter any notes about the customer in the **Notes** field.
2. Enter any additional information that your store collects about customers in the fields on this tab.
{% hint style="success" %}
These are custom fields. Refer to [**Configure custom fields for customer records**](/store-manager/manage-customers/setting-up-custom-fields.md) for more information.
{% endhint %}
7. (Optional) On the **Alias** tab, enter any aliases that may be used to look up the customer in POS:
1. Tap **New**.
2. Enter the alias.
3. Tap **Save**.
---
# Agent Instructions
This documentation is published with GitBook. GitBook is the documentation platform designed so that both humans and AI agents can read, navigate, and reason over technical content effectively. Learn more at gitbook.com.
## Querying This Documentation
If you need additional information that is not directly available in this page, you can query the documentation dynamically by asking a question.
Perform an HTTP GET request on the current page URL with the `ask` query parameter, and the optional `goal` query parameter:
```
GET https://docs.rmhpos.com/readme-1/work-with-customers/customers-adding.md?ask=&goal=
```
`ask` is the immediate question: it should be specific, self-contained, and written in natural language.
`goal` is optional and describes the broader end goal you are ultimately trying to accomplish on behalf of the user. GitBook uses it to tailor the answer towards what is most useful for that goal.
The response will contain a direct answer to the question and relevant excerpts and sources from the documentation.
Use this mechanism when the answer is not explicitly present in the current page, you need clarification or additional context, or you want to retrieve related documentation sections.