> For the complete documentation index, see [llms.txt](https://docs.rmhpos.com/llms.txt). Markdown versions of documentation pages are available by appending `.md` to page URLs; this page is available as [Markdown](https://docs.rmhpos.com/readme-1/customize-the-pos-screen/setting-up-integrated-web-site.md).
# Enable the Internet tab
This topic describes how to enable the optional Internet tab in POS.
Stores have the option to activate the **Internet** tab, located to the left of the POS window, and set a default web site such as the store's e-commerce site, a supplier's site or a shipping company's site.
{% hint style="warning" %}
Once the Internet tab is enabled, store employees can use it to navigate to various internet sites. This can expose the store to risk.
{% endhint %}
Activating the Internet tab is a two-step process:
1. Enable the Internet tab in a POS profile.
2. Assign the POS profile to the register(s).
## **Enable the Internet tab in a POS profile**
1. In Store Manager, click **Setup**.
2. Expand **Hardware**.
3. Click **POS Profiles**.
4. Do one of the following:
* Double-click an existing POS profile to open and edit it.
* Click **New** and create a new POS profile.
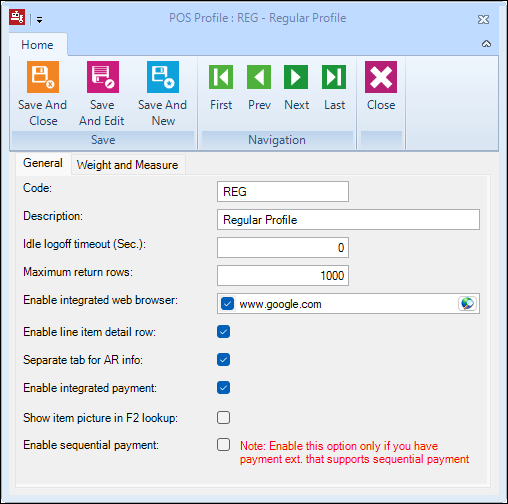
5. Select **Enable integrated web browser** and either type or paste the web site URL into the field.
6. Click the **Preview** icon to test the web site URL. (If you entered it correctly, the web site will open in a tab in your web browser.)
7. Click **Save And Close**.
## **Assign the POS profile to the register**
1. Click **Setup**.
2. Expand **Hardware**.
3. Click **Register List**.
4. Do one of the following:
* Double-click an existing register to open and edit it.
* Click **New** and create a new register.
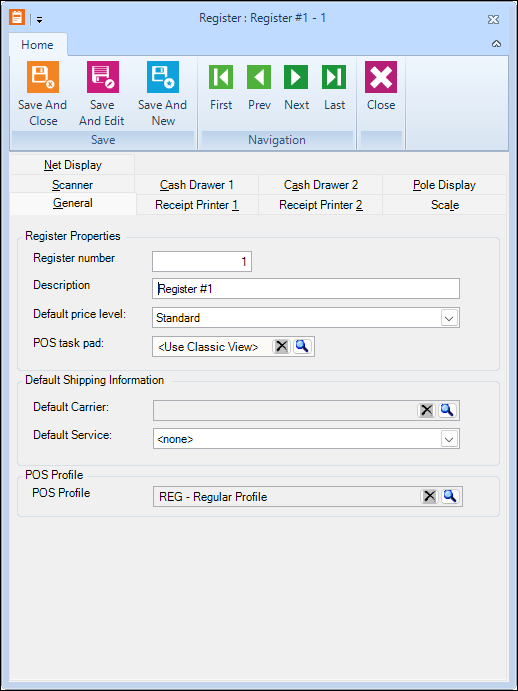
5. On the **General** tab, from **POS Profile**, select the POS profile with the enabled integrated web site.
6. Click **Save And Close**. The integrated web site it now enabled for all registers using the POS profile.
---
# Agent Instructions
This documentation is published with GitBook. GitBook is the documentation platform designed so that both humans and AI agents can read, navigate, and reason over technical content effectively. Learn more at gitbook.com.
## Querying This Documentation
If you need additional information that is not directly available in this page, you can query the documentation dynamically by asking a question.
Perform an HTTP GET request on the current page URL with the `ask` query parameter, and the optional `goal` query parameter:
```
GET https://docs.rmhpos.com/readme-1/customize-the-pos-screen/setting-up-integrated-web-site.md?ask=&goal=
```
`ask` is the immediate question: it should be specific, self-contained, and written in natural language.
`goal` is optional and describes the broader end goal you are ultimately trying to accomplish on behalf of the user. GitBook uses it to tailor the answer towards what is most useful for that goal.
The response will contain a direct answer to the question and relevant excerpts and sources from the documentation.
Use this mechanism when the answer is not explicitly present in the current page, you need clarification or additional context, or you want to retrieve related documentation sections.