Setting up serialized items
Serialized items are items that have a unique serial number associated with them. Examples of serialized items include cell phones, laptops, tablets, modems, TV streaming devices, and certain types of cards (e.g., SIM cards, phone cards). This topic describes all steps required to set up serialized items in RMH.
Setting up store rules for serial numbers
|
1.
|
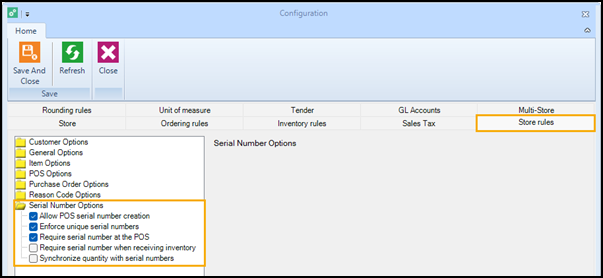
Click File | Configuration. |
|
3.
|
Expand Serial Number Options. |
|
4.
|
Select any of the following options: |
-
Allow POS serial number creation: Select this option if you want enable cashiers to enter new serial numbers in POS when they sell vouchers. This option enables serial number creation, but does not require it.
-
Enforce unique serial numbers: Select this option if you require cashiers to enter or select unique serial numbers in POS when they sell vouchers or use vouchers to tender transactions. When this option is selected, duplicate serial numbers cannot be entered or selected.
-
Require serial number at POS: Select this option if you require cashiers to enter or select serial numbers in POS when they sell vouchers or use vouchers to tender transactions.
-
Require serial number when receiving inventory: Select this option if you require employees to record the serial numbers of serialized items when receiving inventory against a purchase order.
-
Synchronize quantity with serial numbers: Select this option if you want to update the item's quantity whenever a serial number is added on the Serial tab in the Item window.
Note: You can only enable the Synchronize quantity with serial numbers option if you have also enabled the Enforce unique serial numbers, Require serial number at POS, and Require serial number when receiving inventory options.
Adding serialized items
|
4.
|
Select Standard Item and click OK. |
|
a.
|
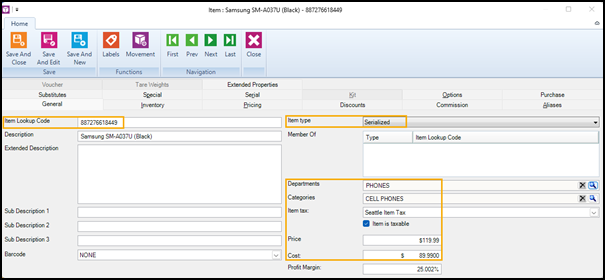
For the Item Lookup Code, enter the UPC for the serialized item. |
|
b.
|
(Optional) Enter a Description. |
|
c.
|
From Item type, select Serialized. |
|
d.
|
Select a Department and Category. |
|
f.
|
Enter the Price and Cost. |
|
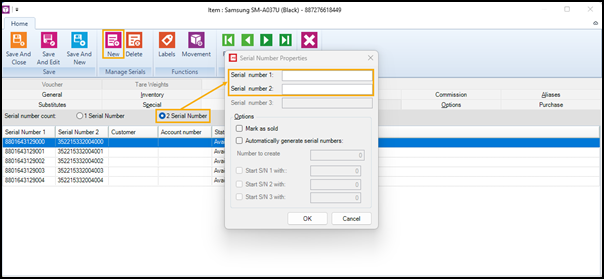
a.
|
Select the number of serial numbers associated with the item. The available options are 1 Serial Number, 2 Serial Number, or 3 Serial Number. |
Note: RMH can record up to three serial numbers for serialized items.

|
b.
|
Under Manage Serials, click New. |
|
c.
|
Enter the item's serial numbers in the Serial number 1, Serial number 2, or Serial number 3 fields. |
Note: The Serial number 2 and Serial number 3 fields are only activated if you selected 2 Serial Number or 3 Serial Number for the number of serial numbers associated with the item.