Creating new labels using Label Designer
You can edit existing labels. However, the best practice is to create a new label (which can be based on an existing label), and save the label with a new name. This is because edits to existing labels can be overwritten when RMH is upgraded.
|
2.
|
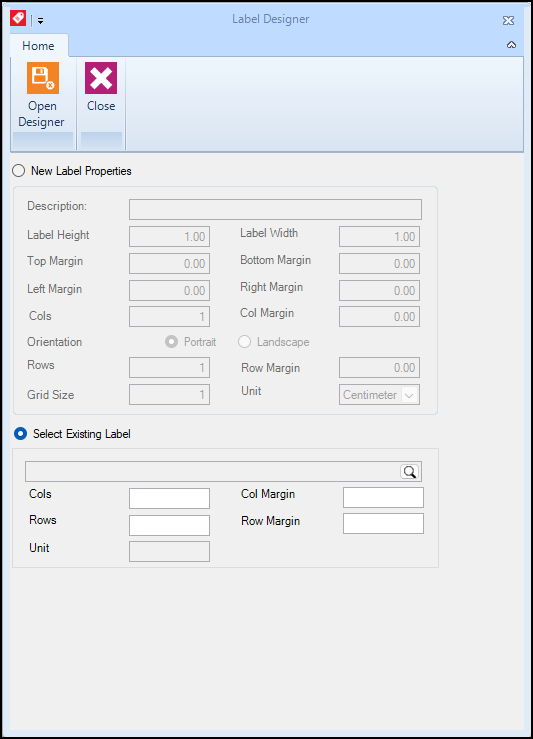
Click Label Designer. The Label Designer wizard displays. |

|
3.
|
Select one of the following: |
-
New Label Properties: Select this option if there are no existing labels with similar dimensions and attributes that you can use as the baseline for your label design.
-
Select Existing Label: Select this option if there is an existing label with similar dimensions and attributes that you can use as a baseline for your label design.
Tip: The best practice is to select an existing label with similar dimensions and attributes as the label you need. If you use an existing label as the starting point for designing a new label, keep in mind that you can change the height but not the width. This is a known issue with the PerpetuumSoft Framework (SharpShooter).
|
4.
|
If you selected New Label Properties: |
|
a.
|
Enter a Description for the label. |
|
b.
|
Go to the Unit field and select the unit of measurement to use for the label dimensions, e.g., Inch, Centimeter, Point, Twip. |
Note: A twip is a typographical measurement. One twip is 1/1440 inch. Another way of thinking of it is that 1 inch = 1440 twips. The default Avery label templates shipped with RMH use twips.
|
c.
|
Enter the Label Height and Label Width. |
|
d.
|
Enter the Top Margin, Bottom Margin, Left Margin, and Right Margin. |
These margin measurements identify the amount of space from the printed label information to the top, bottom, left, and right edges of the label.
|
e.
|
Enter the Cols and Col Margin. |
The Cols field identifies the number of columns of labels on each sheet. The Col Margin field identifies the amount of space between columns of labels.
|
f.
|
Enter the Rows and Row Margin. |
The Rows field identifies the number of rows of labels on each sheet. The Row Margin field identifies the amount of space between rows of labels.
If you have set up more than one row, make sure Row Margin is the same height as the label. If you do not do this, the label may print in the same position instead of on a new label.
|
g.
|
From Orientation, select the orientation of the text on the label. The most common orientation is Portrait. |
|
5.
|
If you selected Select Existing Label: |
|
a.
|
Click the Browse icon. |
|
b.
|
Select an existing label format, e.g., Avery Label 5161. |
|
c.
|
Click Open. The Cols, Col Margin, Rows, Row Margin, and Unit fields are populated with the dimensions of the label format you selected. |
|
d.
|
If applicable, enter new Col and Col Margin values. |
|
e.
|
If applicable, enter new Row and Row Margin values. |
|
6.
|
Click Open Designer. The Report Designer window displays. |
|
7.
|
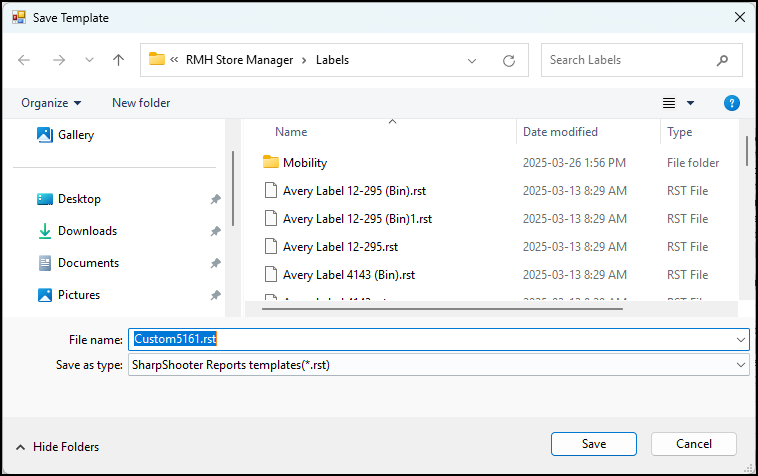
Save the custom label with a unique file name. This is particularly important if you are creating a new label based on an existing Avery label, because the Avery label templates may overwritten or removed when you upgrade RMH. |
|
a.
|
Click File and select Save As. |
|
b.
|
Navigate to the folder where the store keeps its label templates. |
Note: By default, label templates are located under C:\Program Files (x86)\Retail Hero\RMH Store Manager\Labels. However, it is possible to change the default location for label templates to a network folder. To identify the folder where the store keeps its label templates, open Store Administrator, click Configuration, and go to the Path tab. The folder for label templates is identified under Labels.
|
c.
|
Enter a File name for the new label. |


