Importing items using the Import Utility Wizard (Beta)
You can use the Import Utility Wizard to import new items, update existing item properties, or import item aliases from a CSV, XLS, or XLSX file. The Import Utility Wizard is useful if you want to import or update items in bulk.
Note: You cannot use the Import Utility Wizard to add a new Supplier Code, Department Code, Category Code, Item Tax Code, Parent Item Code, or Item Message Code. If these codes do not currently exist in the database, the Import Utility Wizard leaves these fields blank in the Item record. In addition, you cannot use the Import Utility Wizard to change the Item Lookup Code or change item quantities.
To import items or aliases using the Import Utility Wizard:
| 1. | Click Tools. |
| 2. | Click Import Utility. |
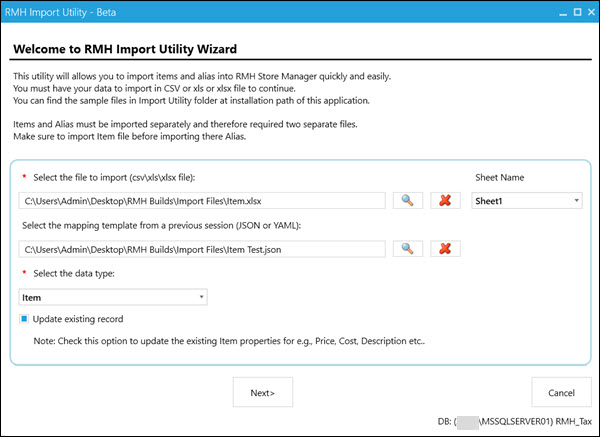
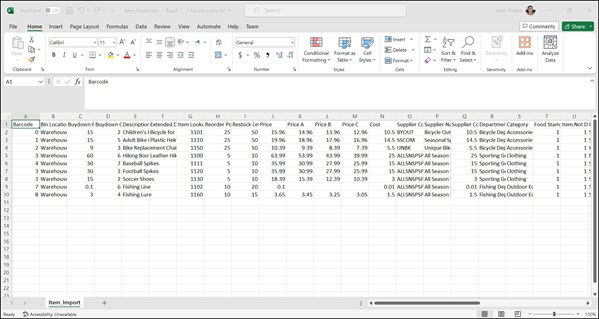
| 3. | Select the import file containing the items you want to add or the item properties you want to update. |
Note: Sample import files are available under C:\Program Files (x86)\Retail Hero\RMH Store Manager\Import Utility. There are six import files to choose from (Item Import.xlsx, Item Import.xls, Item Import.csv, Alias Import.xlsx, Alias Import.xls, Alias Import.csv). Use the sample import files to create your own import files. Refer to Item Import.txt and Alias Import.txt for a list of supported columns. Refer to Mapping rules for the import utility for more information about mapping requirements. Do not merge cells in the import file.
| 4. | Optionally, if you are importing an Excel file that contains multiple sheets, click Sheet Name and select the worksheet containing the items you want to add or item properties you want to update. |
Note: If you do not select a specific worksheet, the Import Utility Wizard will use the first worksheet in the spreadsheet by default.
| 5. | Optionally, select a mapping template file from a previous import. |
You have the option to save the column/item property mappings to a template file. This can save you time in future imports. The mapping template file can be saved in either JSON or YAML format.
Note: You will need to enter the mappings manually the first time, and then click Save Mapping to create the mapping template file to use with future imports.
| 6. | For the data type, select one of the following: |
-
Item: Select if you are importing items or updating existing item properties (excluding the Item Lookup Code).
-
Alias: Select if you are importing item aliases.
| 7. | Select Update existing record if you want to import new items, or update properties for items that already exist in the database. |
Note: If Update existing record is not selected, only new items will be imported. Properties will not be updated for existing items.
| 8. | Click Next. |
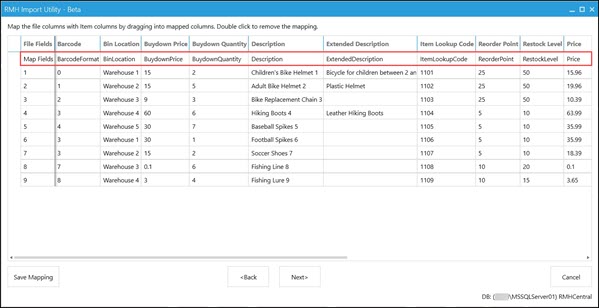
| 9. | If you did not select a mapping template file, manually enter the mappings between the columns in the import file and the fields in the database: |
| a. | In the Map Fields row, in the relevant column(s), select the item property mapping. |
Note: The File Fields row shows the column headings from the import file. The Map Fields row is where you map the column(s) to item properties. Refer to Item Import.txt and Alias Import.txt, available under C:\Program Files (x86)\Retail Hero\RMH Store Manager\Import Utility, for a list of supported columns. Refer to Mapping rules for the import utility for more information about mapping requirements.
| b. | Optionally, once you have selected the relevant mapping(s), click Save Mapping to save the column/item property mapping(s) to a mapping template file for future imports. |
| 10. | Click Next. |
| 11. | Review the mappings. If the import file contains duplicate items or aliases, they are highlighted in red. If necessary, remove or fix the duplicates before starting the import. |
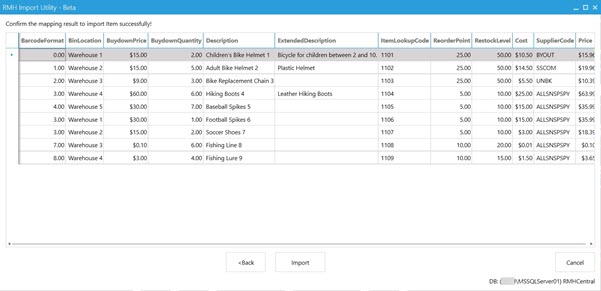
| 12. | Click Import. |
| 13. | Click OK. |
Note: After the import is complete a log file displays so you can check the import for issues. You can find this log file, and previous log files, under C:\ProgramData\RetailHero\RMH Store Import Utility. If there were issues with the import, correct the issues with the applicable records and run the Import Utility Wizard again to complete the import.