Setting up receipt formats
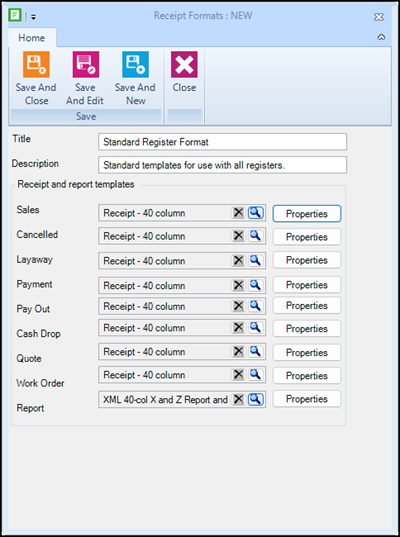
You must create at least one receipt format for each store. The receipt format identifies which receipt templates to use when printing receipts for the different types of transactions entered into POS (Sales, Cancelled, Layaway, Payment, Pay Out, Cash Drop, Quote, or Work Order). The receipt format also identifies the receipt template to use when printing the Z and ZZ reports (Report). A receipt format must be assigned to each of the register(s) used in the store.
You can customize the receipt templates. For example, you can add the store logo, show or hide specific sections, add custom messages, change the font, and more.
|
3.
|
Click Receipt Formats. |
|
5.
|
Enter a Title and Description. |
|
6.
|
In the Receipt and report templates section, click the Browse icon beside a transaction type, such as Sales. |
|
7.
|
Go to C:\Program Files (x86)\Retail Hero\RMH Store Manager\ReceiptTemplates. |
|
8.
|
Select the receipt template. |
-
You can use receipt.xml for all transaction types, such as Sales, Cancelled, Layaway, Payment, Pay Out, Cash Drop, Quote, or Work Order. This is a standard 40-column receipt template.
-
If the store is using the RMH Loyalty Extension, select HeroPoints40Receipt.xml for transactions where you want to print loyalty program information on the receipt, such as Sales. This is a standard 40-column receipt template.
-
If Weights and Measures (WAM) is enabled for POS (under the POS Profile), select WAMReceipt.xml for transactions where you need to include the store's WAM information, such as Sales. This is a standard 40-column receipt template.
-
If you need to print receipts on standard letter/A4 paper, select fullpage.xml.

Note: The template must have a .xml file extension. You cannot use templates that have another file format, such as .rct.
|
10.
|
The message Would you like to update all transaction types that are currently set to [receipt template]? may display. Click Yes to use the same receipt template for the other transaction types. Click No to only use the receipt template for the current transaction type. |
|
11.
|
Click the Browse icon beside Report. |
|
12.
|
Go to C:\Program Files (x86)\Retail Hero\RMH Store Manager\ReceiptTemplates. |
Warning! You should always select XReport.xml for the Report option. This is the receipt template for Z and ZZ reports. If you do not select XReport.xml for the Report option, your Z and ZZ reports will not print.
|
16.
|
Customize the receipt templates as required: |
|
b.
|
Edit the receipt content and format. |
|
c.
|
Click Print to print a test receipt to see the changes you made to the template. |
|
d.
|
Click Save and Close to save the changes to the existing template. Click Save As to save the changes as a new template, e.g., custom.xml. |
|
e.
|
The message Would you like to update all transaction types that are currently set to [receipt template]? may display. Click Yes to use the same receipt template for the other transaction types. Click No to only use the receipt template for the current transaction type. |
|
17.
|
Click Save And Close. |
