3.51.5
Release Date: July 19, 2024
POS
-
No longer possible to set up accounts receivable accounts while tendering a transaction
Starting with release 3.51.5, it is no longer possible to set up accounts receivable (AR) accounts in POS while tendering a transaction. In previous releases, if a cashier tendered a transaction with store credit and the selected customer did not have an AR account, a screen would display with options to either link the customer to an existing AR account or create a new AR account.
The following screen has been removed:

Now, if a cashier tenders a transaction with store credit and the selected customer does not have an AR account, the error message "An account tender is invalid because customer does not have an account" displays.
Cashiers are still be able to set up AR accounts in POS when they create a new customer (Customers | New Customer) or when they edit an existing customer (Customers | Edit Customer).
-
Remove buttons from Register Transaction screen
Starting with release 3.51.5, the Customer and Indirect buttons have been removed from the Register Transaction screen. This screen displays when a transaction is tendered using store credit (on account).
![]()
-
Changes to Account Payment screen
Starting with release 3.51.5, the Account Payment screen has been renamed Payment to Account. In addition, the following fields have been renamed to clarify what is displayed in the fields:
- The Total Owed field is has been renamed Total Balance.
- The Balance field has been renamed Balance Due.
- The Payment received field has been renamed Payment received plus applied credit.
There is also a new option called Apply Credit. If the account has a positive balance (e.g., unapplied credit memos from returns or overpayments), select this option to apply the credit memos to one or more of the open invoices shown on the screen. If you do not select this option, the credit memos are not applied, and the customer must use a tender type that the store accepts for payments to account (e.g., cash or check).
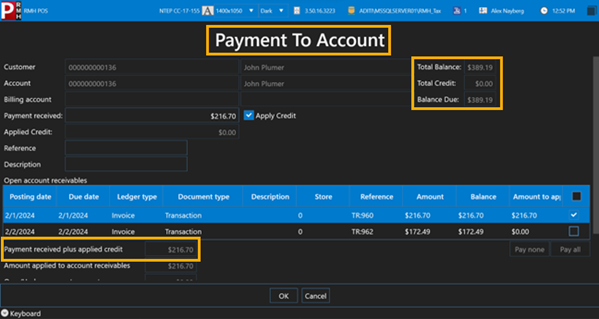
The Payment to Account screen displays if a cashier selects a customer with an AR account and taps Customers | Payment to Account. The workflow for processing payments to account has not changed.
-
New option to manually apply credit memos to open AR invoices
Starting with release 3.51.5, when processing returns for transactions tendered with store credit (on AR account), there is a new option, Manual, available from the Application method drop-down. If the cashier selects Manual, they are prompted to select an open invoice. (They can choose any open invoice, regardless of date.) When the cashier clicks Finish, a credit memo for the return is created and applied to the selected invoice.

Store Manager and POS
-
Changes to returns or voids for transactions tendered with store credit
Starting with release 3.51.5, when processing returns for transactions tendered with store credit (on AR account), the system creates a credit memo entry for the return amount which is automatically applied to the oldest invoice entry (if there are open invoices). When processing voids for transactions tendered with store credit, the system creates a credit memo entry for the void amount which is applied to the same transaction so the two ledger entries have a zero balance. In previous versions, cashiers had the option to manually apply credit memos to any open invoices.
-
WAM certification number for the European Union
Starting with release 3.51.5, Store Manager and POS have a Weights and Measures (WAM) certification number for the European Union (EU). If WAM is enabled for the EU in a POS profile that is assigned to the register, the certification number will display on the POS login screen.
Store Manager
-
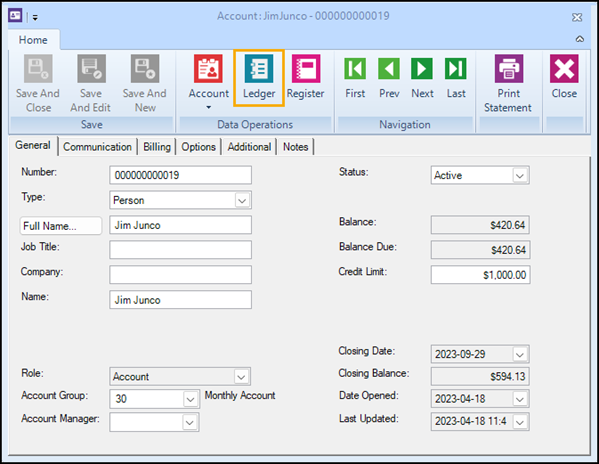
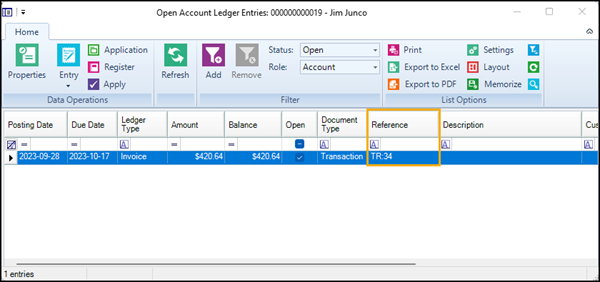
Open journal receipts from the Account Ledger Entries screen
Starting with release 3.51.5, you can open receipts from the Account Ledger Entries screen by double-clicking the transaction number in the Reference column.
There are two scenarios where double-clicking the transaction number in the Reference column will not open the receipt: (1) a cashier has manually entered a value into the Reference field in POS, or (2) the store is centrally managed and the receipt is for a transaction that was entered at a different store.
To open the Account Ledger Entries screen, click Customer | Account, double-click an account to open it, and click the Ledger button.
-
Add new tasks to the Advanced Item Wizard
Starting with release 3.51.5, the following tasks have been added to the Advanced Item Wizard:
-
Task 1130: Change Item Message
-
Task 1180: Change Unit of Measure
- Task 1260: Change Primary Supplier
- Task 5000: Add Supplier
- Task 5030: Set Item Commission
- Task 5090: Change Item Barcode
-
Make Restock Level and Reorder Point columns editable in purchase orders
Starting with release 3.51.5, the Restock Level and Reorder Point columns are editable on the Items tab of purchase orders.
-
Receive purchase orders from foreign currency suppliers in the local currency
Starting with release 3.51.5, when receiving purchase orders from suppliers who use a foreign currency, Store Manager automatically converts the item cost to the local currency based on the exchange rates entered for the foreign currency.
For example, this supplier uses Euro:
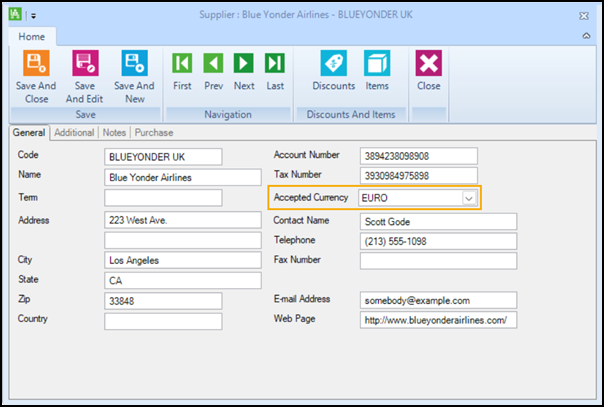
The Local Currency check box at the bottom left of the purchase order is automatically selected and the item cost is shown in the local currency.
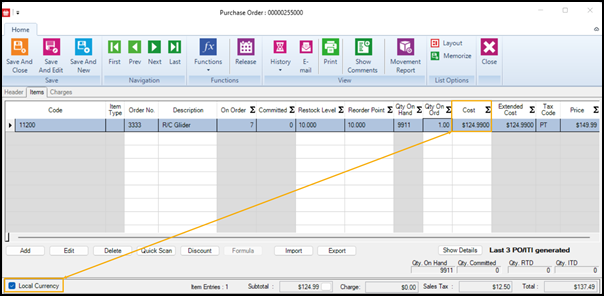
Similarly, invoices automatically show the local currency:

To view the item cost in the supplier's currency, clear the Local Currency check box:

Store Manager and Central Manager
-
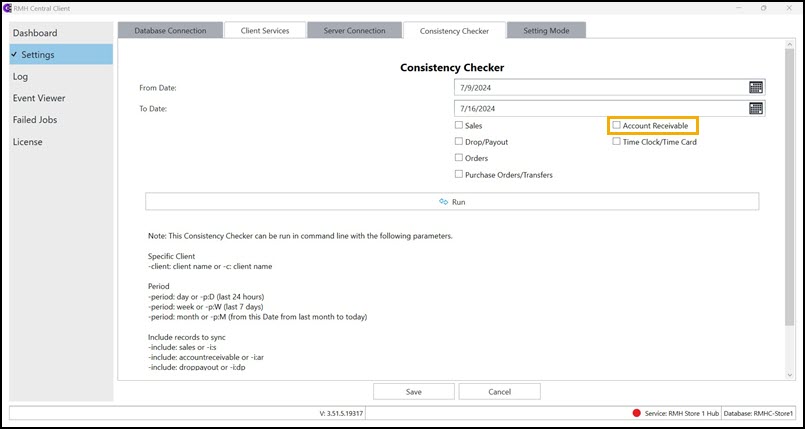
Synchronize AR entries using the Consistency Checker
Starting with release 3.51.5, you can use the Consistency Checker to synchronize AR entries between stores and the Central database. Refer to Use the Consistency Checker for more information.
-
New range values available for date fields in Active Report filters
Starting with release 3.51.5, if you select a date field in an Active Report filter, you can select a dynamic date range value such as Today, Yesterday, This Week, Last Week, This Month, Last Month, This Year, and Last Year. This applies to Active Reports in both Store Manager and Central Manager.
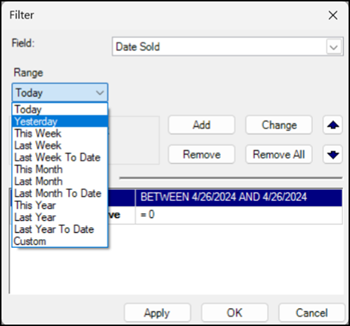
If you select one of these dynamic date range values, the system will automatically select the appropriate dates for the date range based on the date the report is generated. These dynamic date range values are available for any date field, such as Last Sold, Date Created, Date Received, Last Updated, Sale Starts, and Sale End.
You can save your filter selections for future use by memorizing the report.
-
Enable drop-down list for the Sub Description fields in Active Reports
Starting with release 3.51.5, if you use the Sub Description 1, 2, and 3 custom fields for items, you can enable drop-down lists for the Sub Description fields in Active Reports. To do this, go to the folder when you store your Active Reports (e.g., C:\Program Files (x86)\Retail Hero\RMH Store Manager\ActiveReports), open a report, scroll down to the relevant section, and add the field name to the DrillDownFieldName line. For example:
Begin Column
        FieldName = "Item.SubDescription1"
DrillDownFieldName = "Item.SubDescription1"
        DrillDownReportName = ""
        Title = "!CaptionItemSubDescription1"
        VBDataType = vbString
        Formula = ""
        ColHidden = True
        ColNotDisplayable = False
        FilterDisabled = False
        ColWidth = 2115
        GroupMethod = groupmethodNone
        ColFormat = ""
        ColAlignment = flexAlignLeftCenter
        End Column
Note: Restart Store Manager or Central Manager to see the change in the Active Report.
-
Add the ability to drill down to customer record from Active Reports
Starting with release 3.51.5, if an Active Report includes a column for the customer's account number, you can click on the account number to open the customer record. You must have view or full access permissions for customer records to use this functionality. (Access permissions are under Setup | People & Security | Manager User Roles | Privileges | Customer.)
Note: If the customer account is linked to an AR account, once the customer record is open you can click the Account button to open their AR account record if you also have view or full access for AR account records. If you have view or full access for AR account records, but not for customer records, you cannot open the customer record from the Active Report.
-
Extend unit of measure to 10 digits in item record
Starting with release 3.51.5, the number of digits allowed in the Unit of Measure field on the Inventory tab of the Item window has been increased from 4 to 10 digits. A script was added to Force Install Tables in Store Administrator and Central Administrator to update the database schema.
-
Change to inter-store transfer workflow
Starting with release 3.51.5, when one store creates an inter-store transfer (in or out), the matching transfer (in or out) is created in the other store when the transfer is released in the originating store. In previous releases, in some workflows the matching transfer was created when the transfer was released in the originating store, while in other workflows the matching transfer was created when the transfer was shipped in the originating store. With this release, transfer creation is consistent for all workflows.
-
Prevent use of physical inventory and import utility executables outside of apps
Starting with release 3.51.5, if you try to run the following executables outside of Store Manager or Central Manager, the warning message "You cannot run this exe outside this application" displays and the executables will not run:
- C:\Program Files (x86)\Retail Hero\RMH Store Manager\Inventory Count\RMH Physical Inventory.exe
- C:\Program Files (x86)\Retail Hero\RMH Store Manager\Import Utility\RMH.App.Store.ImportUtility.exe
- C:\Program Files (x86)\Retail Hero\RMH Central Manager\Import Utility\RMH.App.Central.ImportUtility.exe
- C:\Program Files (x86)\Retail Hero\RMH Central Manager\Import Utility\RMH Physical Inventory.exe
-
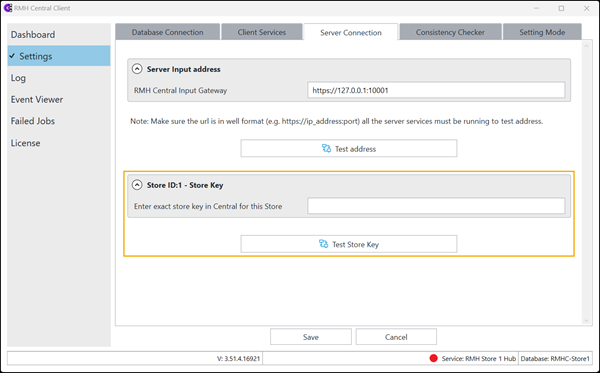
New option for store authentication with Central Manager
Starting with release 3.51.5, you have the option to enter a Store Key, which will be used in combination with Store ID to authenticate the store to Central Manager. In previous releases, only the Store ID was used to authenticate the store to Central Manager.
If you choose to use both Store Key and Store ID for authentication, if authentication fails for one or both values, the store's connection to Central Manager will fail and data synchronization will not take place.
Using Store Key for store authentication is optional. If you upgrade a customer to release 3.51.4 or newer, they are not required to enter a Store Key for stores. However, using a Store Key for store authentication is recommended for all central store installations to improve security.
If you choose to use Store Key for store authentication, you must first add the Store Key in Central Manager and then restart the Central Server services. After you have confirmed that the Central Server services are running, you can then add the Store Key in Central Client.
To enter the Store Key in Central Manager, click Setup | Store | Stores, double-click a store to open it, enter a key in the Store Key field, and click Save And Close. For the key, you can either click the key button to automatically generate a key, or you can manually type a key into the field. The key should be a maximum of 12 characters long, and can be any combination of letters, numbers, or special characters.

To enter the Store Key in Central Client, click Settings | Server Connection. In the Store Key field, enter the same key that you entered for the store in Central Manager. Click Test Store Key to test store authentication with Central Manager. If the authentication fails, check that the Central Server services are running and that you entered the same Store Key for the store that you entered in Central Manager. If the authentication is successful, click Save.
Central Manager
-
New password policy functionality for Central users
Starting with release 3.51.5, you can set up password policies for Central users. You can access this new functionality under Setup | People and Security | Central User Password Policy.
Password policies for Central users come into effect as soon as the policies are configured and saved. For example, if you configure policies for password expiry and password complexity, when existing passwords reach the maximum age defined in the password expiry policy, users must create new passwords that meet the complexity requirements outlined in the password complexity policy. Similarly, when new users are set up in Central Manager or existing Central users voluntarily change their passwords, the new passwords must meet the complexity requirements outlined in the password complexity policy. You can also set up policies to prevent password reuse or to lock user accounts after a specified number of failed login attempts.
-
New buttons available to deactivate floating license keys
Starting with release 3.51.5, new buttons are available in the Central Manager and Central Client apps to deactivate the floating license keys on that computer. After the license keys are deactivated the apps will close. The next time a user opens the apps, they will be prompted to enter a license key. Deactivated license keys are released to the license pool and can be used to activate the Central Manager or Central Client apps on another computer.
You can access the deactivation button in Central Manager by clicking File | License.
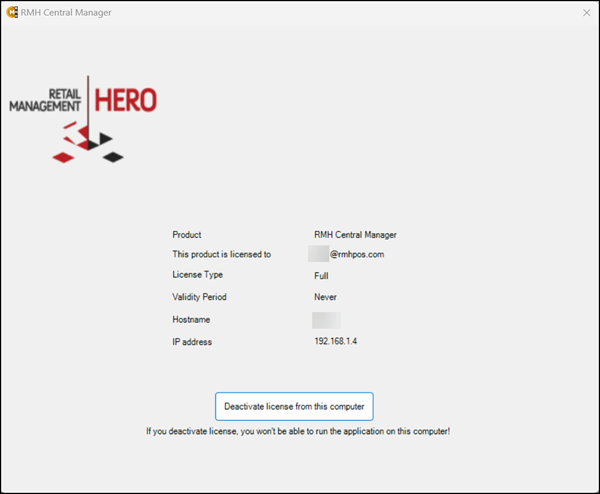
You can access the deactivation button in Central Client by clicking License.
