Set up Central Manager and multiple stores on a test machine
Pre-requisites: The test machine must be running Microsoft SQL Server 2019 Express or higher. Ensure the test machine meets all other system requirements and has POS for .NET installed.
For testing purposes it can be helpful to install Central Manager and multiple Store Manager instances on a single test or demo machine.
|
2.
|
Open Central Administrator. Do the following: |
|
a.
|
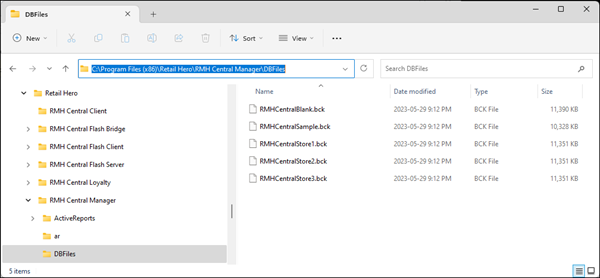
Restore and connect to the sample Central Manager database, RMHCentralSample.bck. |
Note: The sample database is typically available under C:\Program Files (x86)\Retail Hero\RMH Central Manager\DBFiles.
|
3.
|
Open Store Administrator. Do the following: |
|
a.
|
Restore and connect to the sample Store Manager database, RMHCentralStore1.bck. |
Note: The sample database is typically available under C:\Program Files (x86)\Retail Hero\RMH Central Manager\DBFiles.
|
4.
|
Create a new instance of Store Manager for Store2: |
|
a.
|
Open Store Administrator. |
|
b.
|
Connect to the store database. |
|
c.
|
Click Configuration and click Save As and Close. |
|
d.
|
Enter a new configuration file name, e.g., Store2.config, and click OK. |
|
e.
|
Create a copy of the original Store Manager desktop shortcut and rename it RMH Store Manager - Store2 to easily differentiate this store instance from other store instances. |
|
f.
|
Open the shortcut properties and change the Target to the following: |
"C:\Program Files (x86)\Retail Hero\RMH Store Manager\RMH Store Manager.exe" -c Store2.config
|
5.
|
Repeat the previous step for Store3. |
|
6.
|
Create a new instance of Store Administrator for Store2: |
|
a.
|
Create a copy of the original Store Administrator desktop shortcut and rename it RMH Store Administrator - Store2. |
|
b.
|
Open the shortcut properties and change the Target to the following: |
"C:\Program Files (x86)\Retail Hero\RMH Store Manager\RMH Store Administrator.exe" -c Store2.config
|
7.
|
Repeat the previous step for Store3. |
|
8.
|
Open Store Administrator - Store2. Do the following: |
|
a.
|
Restore and connect to the sample Store Manager database, RMHCentralStore2.bck. |
Note: The sample database is typically available under C:\Program Files (x86)\Retail Hero\RMH Central Manager\DBFiles.
|
9.
|
Repeat the previous step for Store3. |
|
10.
|
Create a new instance of the Flash Central Client for Store2: |
|
a.
|
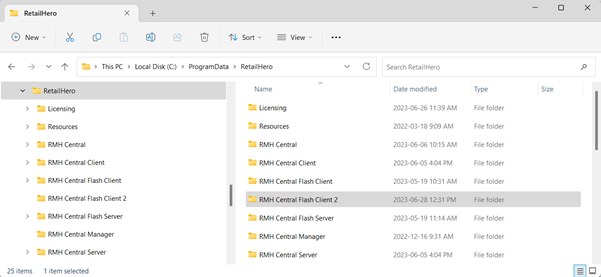
Open C:\ProgramData\RetailHero. |
|
b.
|
Create a new folder called RMH Central Flash Client 2. |
|
c.
|
Run the command prompt as administrator. |
|
d.
|
Navigate to C:\Program Files (x86)\Retail Hero\RMH Central Flash Client. |
|
e.
|
Enter the following command to open the RMH Central Client Wizard: |
RMH.Central.Communication.Store.Wizard.exe -c "RMH Central Flash Client 2"

Note: If a configuration file already exists on the computer, it is not necessary to open the RMH Central Client Wizard to configure services. Instead, the services can be automatically configured using the configuration file. To do this, enter the command RMH.Central.Communication.Store.Wizard.exe -c "RMH Central Flash Client 2" -n
|
g.
|
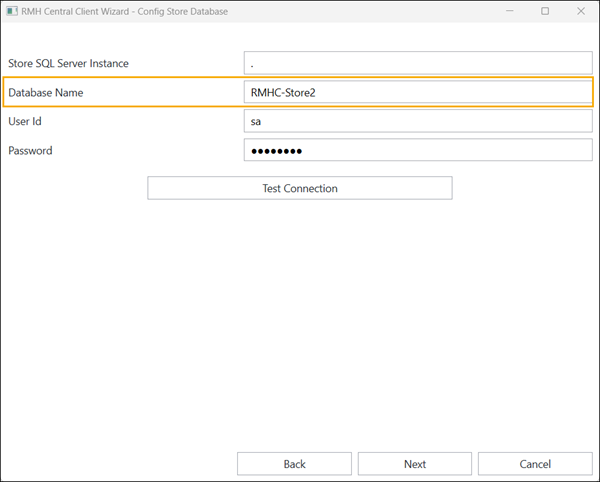
Enter the following to configure the server and database for Store2: |
-
Store SQL Server Instance: Enter the name or IP address of the store SQL Server, including the instance name if you are using a named SQL Server instance.
-
Database Name: Enter the name of the store database, e.g., RMHC-Store2.
-
User ID: Enter the user ID to use for the SQL Server.
-
Password: Enter the password to use for the SQL Server.
|
h.
|
Click Test Connection. |
|
j.
|
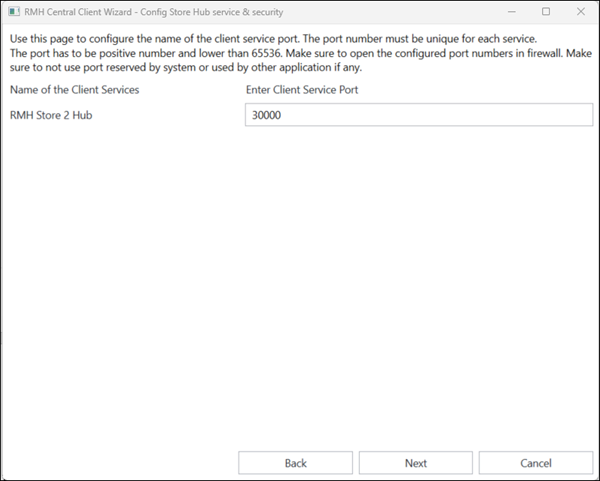
Enter the port for the RMH Store 2 Hub, e.g., 30000, |
Note: You must use a different port from Store1.
|
l.
|
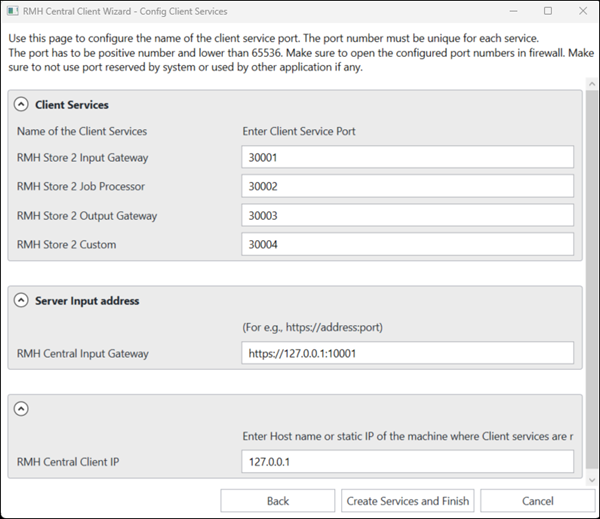
Enter the ports for the Central Client services for Store2: |
-
RMH Store 2 Input Gateway
-
RMH Store 2 Job Processor
-
RMH Store 2 Output Gateway
-
RMH Store 2 Custom
Note: You must use different ports from Store1.
|
m.
|
In the Server Input Address section, enter the RMH Central Input Gateway address and port. |
Note: You must use the same port that you entered in the RMH Central Input Gateway field when you set up the Central Server services.
|
n.
|
Enter the RMH Central Client IP. This is the static IP or hostname of the computer where the client services are running. |
|
o.
|
Click Create Services and Finish. |
|
p.
|
Click OK. The RMH Central Client Wizard will close. |
|
q.
|
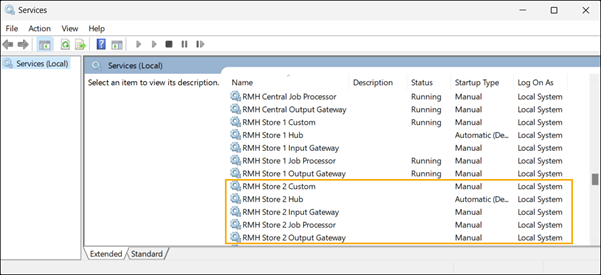
Open Services and confirm that the Central Client services for Store2 were installed successfully: |
|
r.
|
Create a copy of the Central Client desktop shortcut. Rename the new desktop shortcut RMH Central Client - Store2. |
|
s.
|
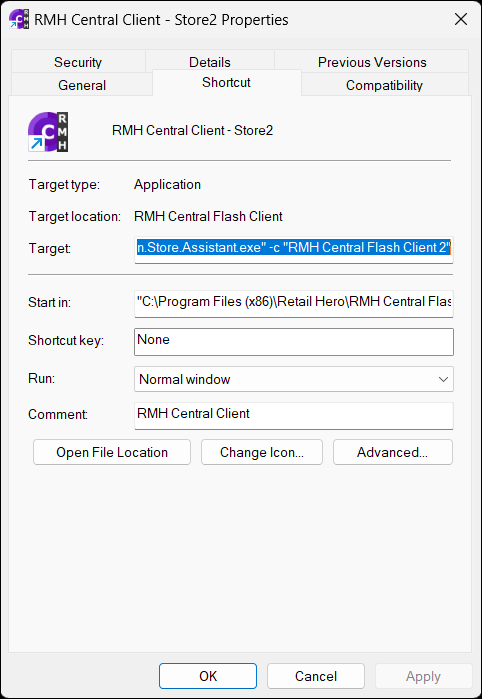
Right-click the new Central Client desktop shortcut and select Properties. |
|
t.
|
On the Shortcut tab, change the Target to the following: |
"C:\Program Files (x86)\Retail Hero\RMH Central Flash Client\RMH.Central.Communication.Store.Assistant.exe" -c "RMH Central Flash Client 2"
Note: You must use the same folder name that you created under C:\ProgramData\RetailHero.
|
11.
|
Repeat the previous step for Store3. |
|
12.
|
Open RMH Central Client - Store2. Do the following: |
|
a.
|
Enter an NFR license key. |
|
13.
|
Repeat the previous step for Store3. |
|
14.
|
Create a new instance of POS for Store2: |
|
a.
|
Open C:\Program Files (x86)\Retail Hero\RMH POS. |
|
b.
|
Right-click RetailHero.POS.App.exe and select Create shortcut. |
|
c.
|
Save the shortcut to the desktop and rename it RMH POS - Store2. |
|
d.
|
Open the shortcut properties and change the Target to the following: |
"C:\Program Files (x86)\Retail Hero\RMH POS\RetailHero.POS.App.exe" -c Store2.config
|
15.
|
Repeat the previous step for Store3. |
|
16.
|
Open each instance of Store Manager. Do the following: |
|
a.
|
Click File | Configuration. |
|
b.
|
Go to the Multi-Store tab. |
|
c.
|
Make sure the Store ID is correct. |
|
d.
|
Select Enable Central Mode. Click OK to continute. |
|
e.
|
Enter the Central Server URL, e.g., http://localhost:21000. |
|
f.
|
Click OK. Store Manager will shut down. |
|
g.
|
Restart Store Manager. It is now operating in Central Mode. |
|
h.
|
Restart POS if it was running. |


